Appearance
流程总览
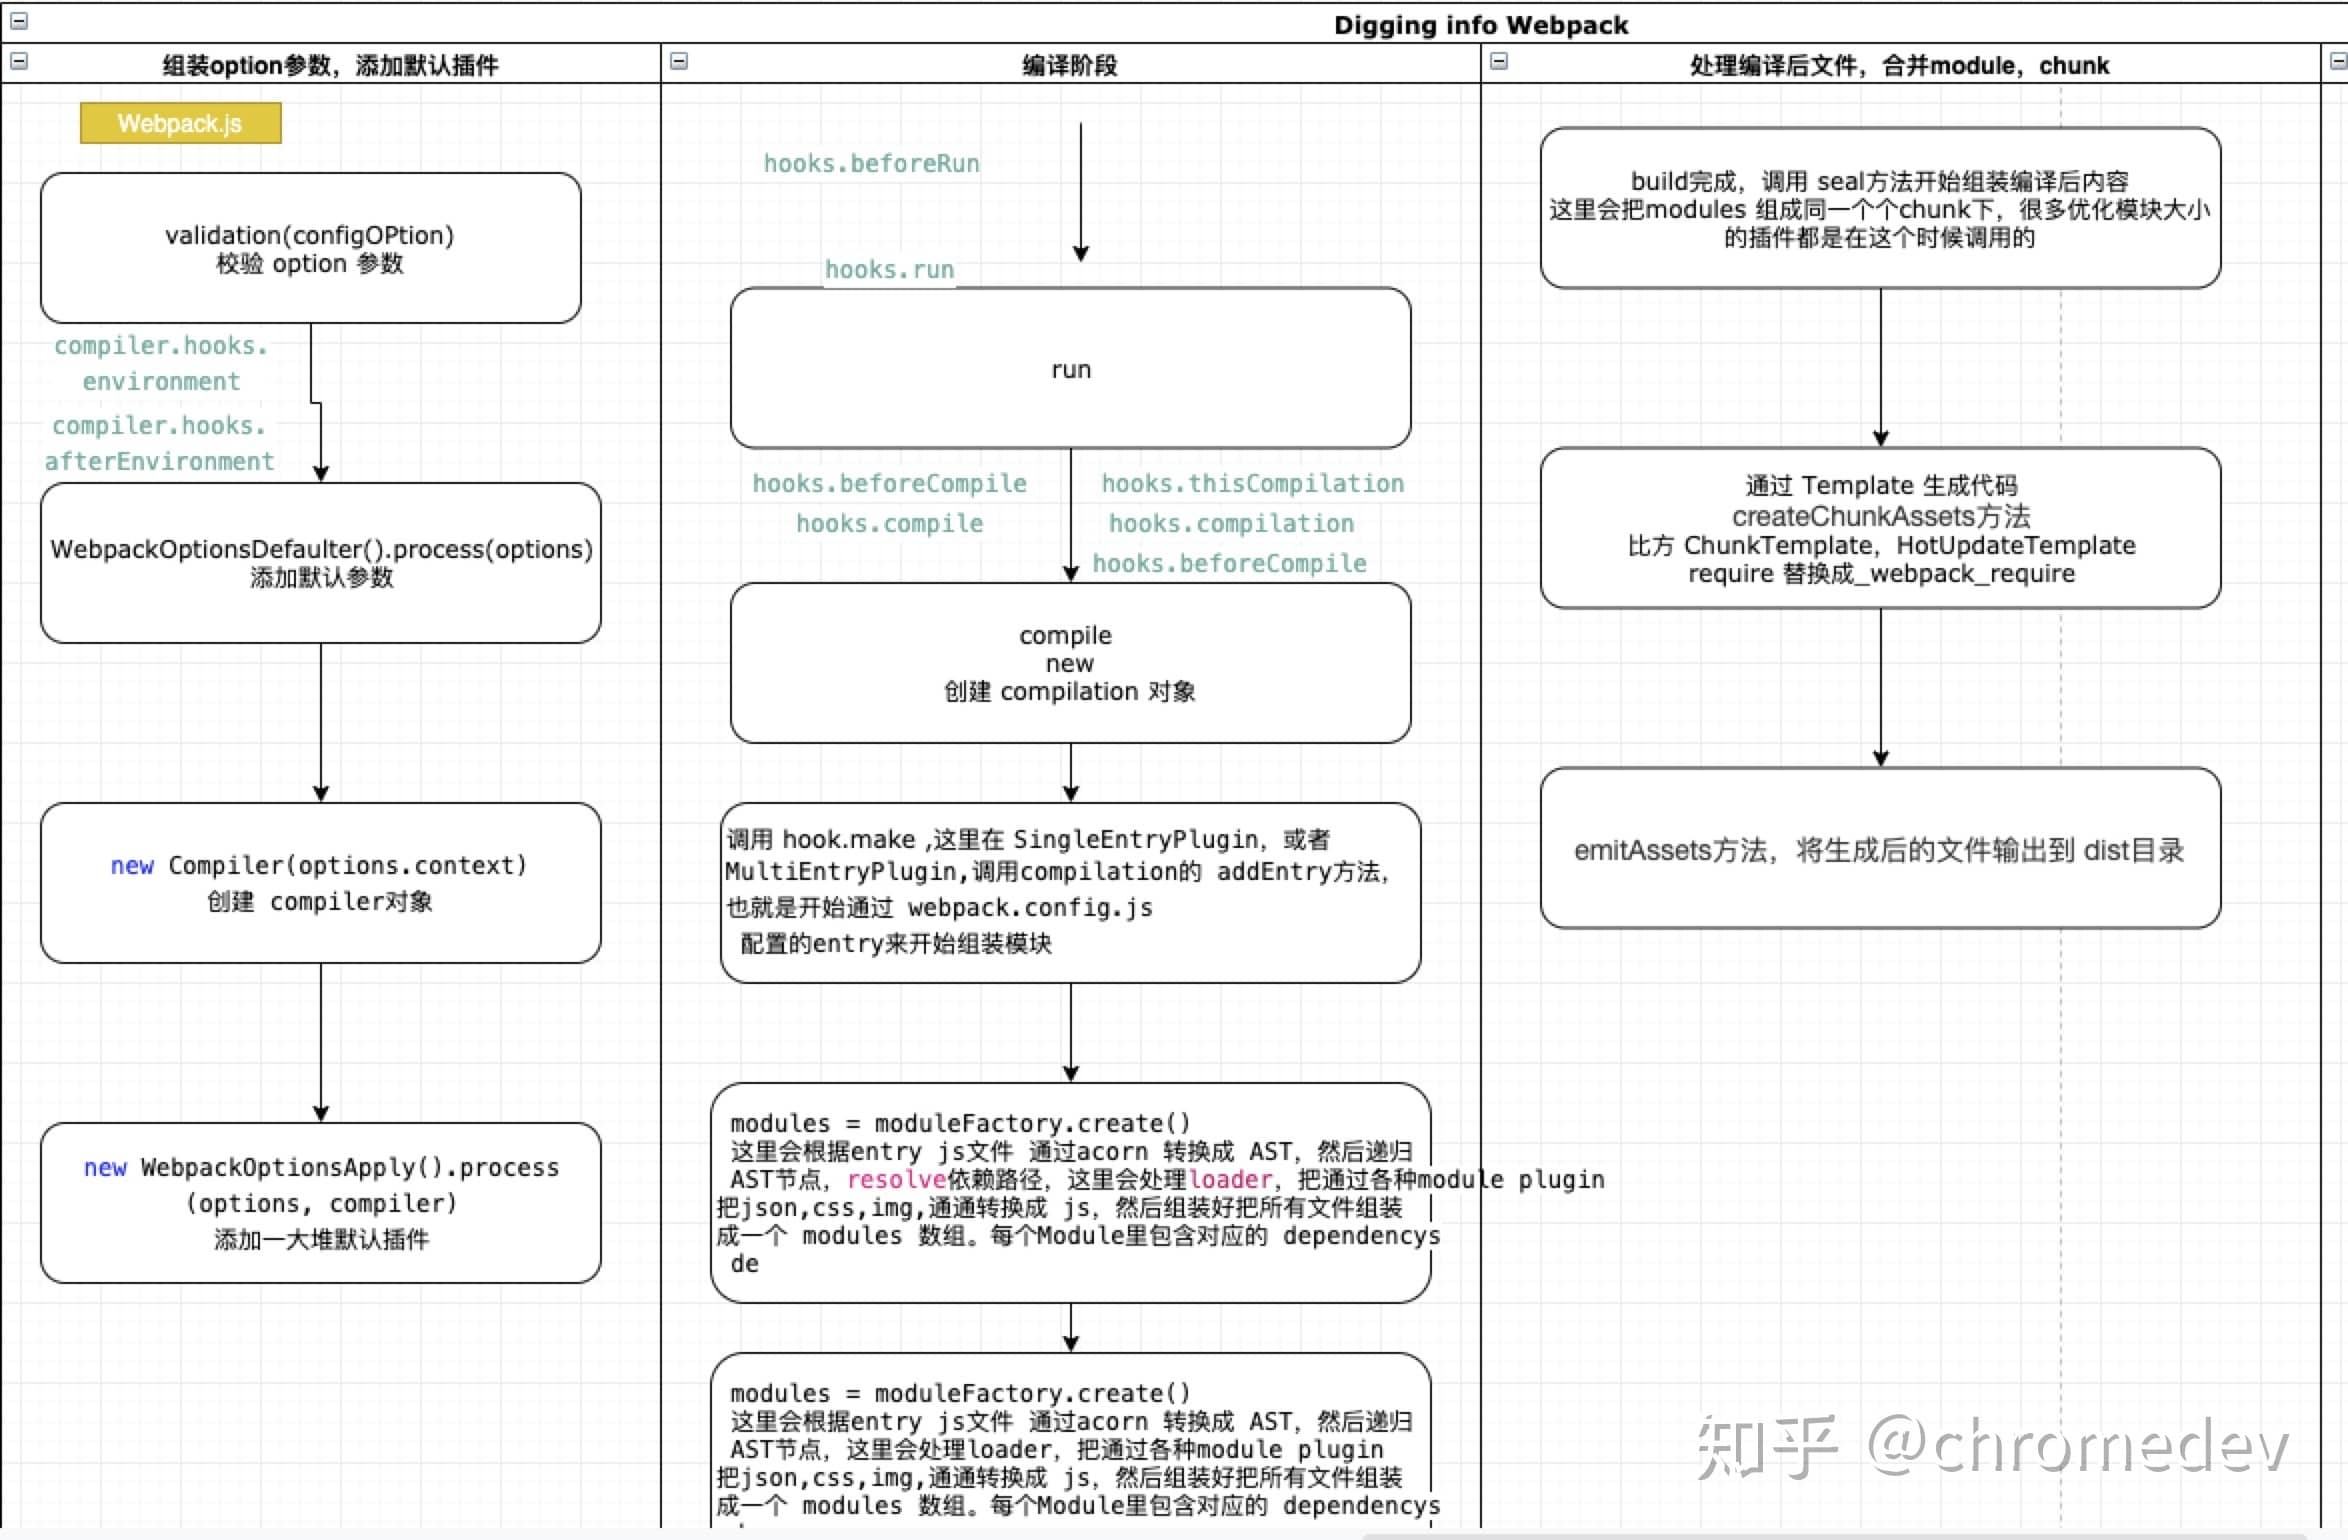
其主要流程分为下面几个步骤
- 初始化参数: 从用户配置文件和 Shell 脚本中的命令语句与默认的参数进行合并从而得到最终的配置参数(
options) - 开始编译: 根据上一步获得的配置参数初始化生成
Compiler 实例对象,加载配置参数中的插件,并从 compiler 对象的run生命周期开始执行 - 确定入口: 根据配置信息中的
entry找到所有的入口文件(单个或者多个) - 编译模块: 从入口文件出发,调用所有配置的 loader 对模块进行翻译,再找出该模块依赖的模块,再 递归 本步骤直到所有入口依赖的文件都经过了本步骤的处理
- 完成模块编译: 在经过第 4 步使用 loader 翻译完所有模块后,得到了每个模块被翻译后的最终内容以及它们之间的 依赖关系图
- 输出资源: 根据入口和模块之间的依赖关系,组装成一个个包含多个模块的 Chunk,再把每个 Chunk 转换成一个单独的文件加入到输出列表,这步是可以修改输出内容的最后机会
- 输出完成: 在确定好输出内容后,根据配置确定输出的路径和文件名,把文件内容写入到文件系统
在上述流程中,涉及到 Webpack 很多核心的对象如 compiler、compilation ,也涉及到两个核心对象在此流程中各个生命周期函数所作的事。
核心流程
对于上述的流程步骤我们又可以将 Webpack 的核心流程分为三大阶段:
- 初始化阶段: 完成上述的 读取和合并配置参数(options),加载对应的 Plugin,根据 options 获取 Compiler 的实例对象
- 编译阶段:根据 entry 入口
- 输出阶段: 对编译后的 module 组合成对应的 Chunk,然后将 Chunk 转换成文件输出
下面我们分别对三个阶段进行稍微详细的说明
初始化阶段
对于初始化阶段其过程相对简单,主要也就是完成上述的主要流程 读取和合并配置参数(options),加载对应的 Plugin,根据 options 获取 Compiler 的实例对象
读取和合并配置参数(options)
这一步主要有以下几个步骤:
校验配置参数格式问题
validateSchema(webpackOptionsSchema, options)使用 Webpack 的默认配置和个人配置合并处理
new WebpackOptionsDefaulter().process(options);
js
const webpack = (options, callback) => {
  // 校验个人配置的参数格式是否有误
  const webpackOptionsValidationErrors = validateSchema(
    webpackOptionsSchema,
    options
  );
  // 配置错误 直接抛出错误
  if (webpackOptionsValidationErrors.length) {
    throw new WebpackOptionsValidationError(webpackOptionsValidationErrors);
  }

  let compiler;
  if (Array.isArray(options)) {
    compiler = new MultiCompiler(
      Array.from(options).map((options) => webpack(options))
    );
  } else if (typeof options === "object") {
    // 使用Webpack的默认配置和个人配置合并处理
    options = new WebpackOptionsDefaulter().process(options);
  } else {
    throw new Error("Invalid argument: options");
  }

  return compiler;
};
生成 Compiler 实例对象
js
// 生成一个 compiler 实例对象
compiler = new Compiler(options.context);
这一步看起来比较简单,但是对于继承于 Tapable 的 Compiler 对象,其定义了非常多的生命周期函数 和 实例对象函数
实例对象函数
Compiler.run(callback): 构建的开始函数Compiler.readRecord(callback): 构建的开始函数Compiler.compile(callback):进行编译Compiler.newCompilationParams(): 创建 Compilation 的参数Compiler.newCompilation():创建新的 CompilationCompiler.emitAssets(compilation, callback): 输出构建资源Compiler.emitRecords(callback):输出构建记录
生命周期钩子函数
- 构建环境有关
| 事件名称 | 内容说明 | 参数 | 类型 |
|---|---|---|---|
environment | - | - | sync 同步 |
after-environment | 环境设置完成 | - | sync 同步 |
- 配置有关
| 事件名称 | 内容说明 | 参数 | 类型 |
|---|---|---|---|
entry-option | - | - | basicResult |
after-plugins | 设置完一组初始化插件之后 | compiler | sync 同步 |
- compilation
| 事件名称 | 内容说明 | 参数 | 类型 |
|---|---|---|---|
this-compilation | 在触发 compilation 事件之前 | compilation | sync 同步 |
compilation | compilation 创建完成 | compilation | sync 同步 |
- 生命周期有关
| 事件名称 | 内容说明 | 参数 | 类型 |
|---|---|---|---|
after-resolvers | 设置完 resolvers 之后 | compiler | sync 同步 |
normal-module-factory | 创建出一个 NormalModuleFactory 之后 | normalModuleFactory | sync 同步 |
context-module-factory | 创建出一个 ContextModuleFactory 之后 | contextModuleFactory | sync 同步 |
need-additional-pass | - | - | bailResult |
before-run | compiler.run() 开始 | compiler | async 异步 |
run | 在读取记录之前 | compiler | async 异步 |
watch-run | 在开始编译之前,watch 之后 | compiler | async 异步 |
before-compile | compilation 的参数已创建 | compilationParams | async 异步 |
compile | 在创建新 compilation 之前 | compilationParams | sync 同步 |
make | - | compilation | parallel 平行 |
after-compile | - | compilation | async 异步 |
should-emit | 此时可以返回 true/false | compilation | bailResult |
emit | 在生成资源并输出到目录之前 | compilation | async 异步 |
after-emit | 在生成资源并输出到目录之后 | compilation | async 异步 |
done | 完成编译 | stats | sync 同步 |
failed | 编译失败 | error | sync 同步 |
invalid | 在无效的 watch 编译之后 | fileName、changeTime | sync 同步 |
watch-close | 在停止 watch 编译之后 | - | sync 同步 |
构建环境有关钩子函数
- environment
在编译器准备环境时调用,时机就在配置文件中初始化插件之后
- afterEnvironment
当编译器环境设置完成后,在 environment hook 后直接调用。
加载 Plugin
这是整个 webpack 最大的地方,webpack 的所有功能都是基于一个个插件现实的,此处主要是去加载并执行每一个 plugin,在插件中通过 Tapable 去订阅 compiler 各个生命周期的钩子函数,从而实现各生命周期的功能。 其主要分为两个部分:
- 配置信息中定义的 plugin
js
// 调用 NodeEnvironmentPlugin钩子函数-- 主要是提供读写监听文件等方法
new NodeEnvironmentPlugin({
  infrastructureLogging: options.infrastructureLogging,
}).apply(compiler);
// 处理配置项中所有的plugins ,即调用每个plugins.apply(compiler)
// 然后插件在apply通过compiler 去 注册依赖的 hooks钩子函数处理
if (options.plugins && Array.isArray(options.plugins)) {
  for (const plugin of options.plugins) {
    if (typeof plugin === "function") {
      plugin.call(compiler, compiler);
    } else {
      plugin.apply(compiler);
    }
  }
}- webpack 内置的基础插件
js
// webpack 自己的根据option配置项进行处理compiler 的plugin
// 在此将会添加很多webpack内置的 钩子函数
compiler.options = new WebpackOptionsApply().process(options, compiler);
编译阶段
对于编译阶段这就是一个非常长的流程,其先从 compiler.run(callback)入口函数开始从 entry 配置的入口文件开始编译整个项目文件,其主要经历了 compiler 和 compilation 的几个核心的生命周期流程
compiler.run
compiler.run() 流程主要围绕 compile 流程的前后处理,在 compile 之前 涉及到两个生命周期钩子函数,从其钩子可以看出这两个生命周期的作用主要是围绕编译执行一些环境变量有关、缓存、编译速度提升有关的功能。在 compile 完成之后执行 emitAssets()流程
核心代码
js
function compiler.run(callback) {
  const finalCallback = (err, stats) => {
    this.running = false
    if (err) {
      this.hooks.failed.call(err)
    }
    if (callback !== undefined) return callback(err, stats)
  }

  const onCompiled = (err, compilation) => {
    if (this.hooks.shouldEmit.call(compilation) === false) {
      this.hooks.done.callAsync(stats, err => {
        return finalCallback(null, stats)
      })
      return
    }

    this.emitAssets(compilation, err => {
      if (compilation.hooks.needAdditionalPass.call()) {
        compilation.needAdditionalPass = true
        this.hooks.done.callAsync(stats, err => {
          this.hooks.additionalPass.callAsync(err => {
            this.compile(onCompiled)
          })
        })
        return
      }

      this.emitRecords(err => {
        this.hooks.done.callAsync(stats, err => {
          return finalCallback(null, stats)
        })
      })
    })
  }

  // 1. 调用 befireRun 钩子函数
  // 在这一步好像就只有一个 beforeRun钩子  即 NodeEnvironmentPlugin.js 中定义的 ---主要用来清除读取的所有的文件的缓存
  this.hooks.beforeRun.callAsync(this, err => {
    // 2. 真正的开始运行  run
    // 这一步的钩子函数就很多的了
    // - CachePlugin
    // - HappyPlugin
    this.hooks.run.callAsync(this, err => {
      // 执行统计信息
      this.readRecords(err => {
        this.compile(onCompiled)
      })
    })
  })
}
compiler.hooks.beforeRun.callAsync(this, err => {})
这一步主要是 compiler 调用 run 运行之前的钩子函数,其中默认只有一个钩子函数
- NodeEnvironmentPlugin
compiler.hooks.beforeRun.tap("NodeEnvironmentPlugin", compiler => {})
这个主要的功能就是清除缓存的所有的读取的文件
compiler.hooks.run.callAsync(this, err => {})
run 钩子函数,在这一步钩子还是不少的
- HappyPlugin
处理 HappyPlugin
- CachePlugin
主要处理 compiler._lastCompilationFileDependencies
compiler.compile 流程
对于这一步我们应该先看一下源码
js
compile(callback) {
		// 生成 compliation 的参数
		const params = this.newCompilationParams();
		// compile.hooks.beforeCompile
		this.hooks.beforeCompile.callAsync(params, err => {
			if (err) return callback(err);
			// compile.hooks.compile
			this.hooks.compile.call(params);
			// 构建 compilation 实例对象
			const compilation = this.newCompilation(params);
			// compile.hooks.make
			this.hooks.make.callAsync(compilation, err => {
				if (err) return callback(err);
				// compilation.finish
				compilation.finish(err => {
					if (err) return callback(err);
					// compilation.seal
					compilation.seal(err => {
						if (err) return callback(err);

						this.hooks.afterCompile.callAsync(compilation, err => {
							if (err) return callback(err);

							return callback(null, compilation);
						});
					});
				});
			});
		});
	}
从源码中可以看出这一步贯穿了整个 compiler 和 complation 的核心流程,从 compiler.compole类型钩子 => 创建 compilation 实例对象 => compiler.make钩子 => compilation.finish => compilation.seal
生成 compilation 入参
在 beforeCompile 之前其开始创建 compilation 的 params
js
newCompilationParams() {
		const params = {
			normalModuleFactory: this.createNormalModuleFactory(),
			contextModuleFactory: this.createContextModuleFactory(),
			compilationDependencies: new Set()
		};
		return params;
	}
compiler.hooks.beforeCompile.callAsync()
没有钩子
compiler.hooks.compile.call()
创建 compilation 实例对象
核心: 在初始化阶段通过 plugin 定义并加载了很多插件,在这些插件中通过 compiler.hooks.thisCompilation.tap("CachePlugin", (compilation) => {}) 去定义了很多 compilation 初始化阶段执行的钩子函数,那么在初始化 compilation 实例对象阶段就是去一一回调这些钩子函数。
涉及到 compiler 的两个有关 compolation 的钩子函数
compiler.hooks.thisCompilation.call(compilation, params);
回调插件中定义的 compilation 初始化阶段执行的钩子函数
涉及到的插件如下:
- JsonpTemplatePlugin
new JsonpMainTemplatePlugin().apply(compilation.mainTemplate);
定义了 mainTemplate 的 localVars、jsonpScript、linkPreload、linkPrefetch、requireEnsure、requireExtensions、bootstrap、beforeStartup、afterStartup、startup、hotBootstrap等的钩子函数。
mainTemplate.hooks.localVars.tap('JsonpMainTemplatePlugin', (source, chunk) => {})
new JsonpChunkTemplatePlugin().apply(compilation.chunkTemplate);
定义了 chunkTemplate 的 render、hash、hashForChunk的钩子函数
chunkTemplate.hooks.render.tap("JsonpChunkTemplatePlugin", (source, chunk) => {})new JsonpHotUpdateChunkTemplatePlugin().apply(compilation.hotUpdateChunkTemplate);
定义了 hotUpdateChunkTemplate 的 render、hash的钩子函数
hotUpdateChunkTemplate.hooks.render.tap("JsonpHotUpdateChunkTemplatePlugin", (source, chunk) => {})
- FetchCompileWasmTemplatePlugin
处理 WasmMainTemplatePlugin 的 钩子函数的初始化,定义了 mainTemplate 的 localVars、requireEnsure、requireExtensions等的钩子函数。
mainTemplate.hooks.localVars.tap('WasmMainTemplatePlugin', (source, chunk) => {})
- SplitChunksPlugin
定义了
compilation.hooks.unseal.tap("SplitChunksPlugin", () => {})在 unseal 阶段的钩子函数定义了
compilation.hooks.optimizeChunksAdvanced.tap("SplitChunksPlugin", (chunks) => {})
- CachePlugin
缓存
compilation.cache = cache;定义了
compilation.hooks.childCompiler.tap("CachePlugin", (childCompiler, compilerName, compilerIndex) => {})钩子函数
主要是处理模块的缓存处理
compiler.hooks.compilation.call(compilation, params);
mini-css-extract-plugin
5.1.
compilation.hooks.normalModuleLoader.tap('mini-css-extract-plugin', (lc, m) => {})5.2.
compilation.dependencyFactories.set(CssDependency, new CssModuleFactory());
设置 css 类型的 moudle 的 moduleFactory()
5.3. compilation.dependencyTemplates.set(CssDependency, new CssDependencyTemplate())
设置 css 类型的 moudle 的 dependencyTemplate()
5.4. compilation.mainTemplate.hooks.renderManifest.tap('mini-css-extract-plugin', (result, { chunk }) => {})
待解决
5.5. compilation.chunkTemplate.hooks.renderManifest.tap('mini-css-extract-plugin', (result, { chunk }) => {})
待解决
5.6. compilation.mainTemplate.hooks.hashForChunk.tap('mini-css-extract-plugin', (result, { chunk }) => {})
待解决
5.7. compilation.hooks.contentHash.tap('mini-css-extract-plugin', (chunk) => {})
待解决
5.8. mainTemplate.hooks.localVars.tap('mini-css-extract-plugin', (source, chunk) => {})
待解决
5.9. mainTemplate.hooks.requireEnsure.tap('mini-css-extract-plugin', (source, chunk, hash) => {})
待解决
compiler.make 阶段
对于这个钩子函数,首先应该看以下哪些插件使用了这个钩子函数
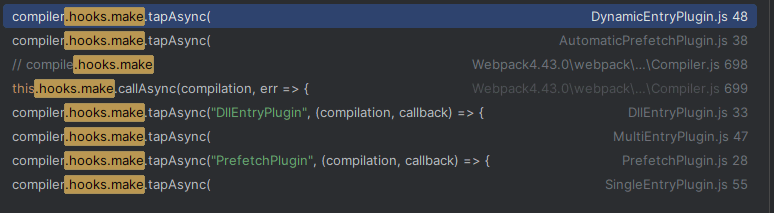
所以 mark 阶段主要就是根据不同类型的入口文件去调用相应的插件进行入口文件的编译工作,如
- SingleEntryPlugin
单入口配置
作用: 处理单个 string 类型的入口文件,如 entry: "./src/entry" 及 entry: { a: "./src/entry" }
- MultiEntryPlugin
多个入口配置
- DynamicEntryPlugin
动态入口配置
作用: 根据动态函数获取对应的入口文件,再进行编译: 如:() => './src/entry'
- DllEntryPlugin
- PrefetchPlugin
下面进入 compilation 的核心流程
compilation module
这一大步主要做的是 Compilation 阶段对文件的加载过程,其主要涉及到 Module、Rule、Resolve 等多个核心模块。
此处我们只讲解编译加载的流程,具体模块例外说明
module 的初始化
对于这一步是在 生成 compilation 入参这个阶段进行的,其创建了 normalModuleFactory、contextModuleFactory、compilationDependencies三个实例对象
module 的创建
创建一个当前 NormalModuleFactory 或者 ContextModuleFactory 工厂函数的 module。
这一步主要通过工厂模式去生成 NormalModule 的实例对象,并将此 module 关联的 resouce 和 loaders 信息存储到对应的实例 module 信息中。
重点:
此处不会进行 module 资源的加载解析等工作,只是根据资源的路径信息 ,如
./src/entry获取到此资源类型的路径详细信息 (c://xxx/src/entry.js),获取到解析.js类型资源需要的 loader 的详细信息,具体可以看 resolve这边涉及到 Module 通过 RuleSet 获取文件后缀类型对应的 loader,通过 resolve 加载相应 loader 的执行文件方法
module.build
这一步是经过 compilation.buildModule => normalModule.build()的过程,在这个过程中会执行 module 对应的 loader 获取到module._source 和 收集相应的 dependencies 等信息
module.afterBuild
主要是处理 build 过程中收集的 dependencies 依赖信息 (this.processModuleDependencies(module))。
compilation.finish(err => {})
compilation.seal
当模块解析完,就来到了 seal 阶段,对处理过的代码进行封装输出。目的是将 module 生成 chunk,并封存到 compilation.assets 中,在这个过程可以做各种各样的优化
这一部分也会触发非常多的钩子函数,其中比较重要的两个钩子函数为:
- SideEffectsFlagPlugin
处理模块中的副作用。主要是识别 package.json 或者 module.rules 的 sideEffects 标志(纯的 ES2015 模块),安全地删除未用到的 export 导出
- FlagDependencyUsagePlugin
在编译时标记依赖 unused harmony export 用于 Tree shaking
js
const seal = (callback) => {
  // 1. 生成 chunkGraph 实例
  const chunkGraph = new ChunkGraph(this.moduleGraph);
  this.chunkGraph = chunkGraph;

  for (const module of this.modules) {
    ChunkGraph.setChunkGraphForModule(module, chunkGraph);
  }

  // 2. 触发 seal 钩子
  this.hooks.seal.call();

  this.logger.time("optimize dependencies");
  while (this.hooks.optimizeDependencies.call(this.modules)) {
    /* empty */
  }
  this.hooks.afterOptimizeDependencies.call(this.modules);
  this.logger.timeEnd("optimize dependencies");
};
输出阶段(seal)
生成 Chunks
在生成 Chunks 阶段我们首先需要理解几个定义:
chunkGroup 由 chunk 组成,一个 chunkGroup 可以包含多个 chunk,在生成/优化 chunk graph 时会用到;
chunk 由 module 组成,一个 chunk 可以包含多个 module,它是 webpack 编译打包后输出的最终文件;
module 就是不同的资源文件,包含了你的代码中提供的例如:js/css/图片 等文件,在编译环节,webpack 会根据不同 module 之间的依赖关系去组合生成 chunk
对于每一个 module 其也有三个比较特殊的属性
- module.dependencies
保存了当前 module 下同步类型的子 module,对于这种类型的 module 不会生成新的 chunk,只会加入到根 module 的 modules 中(如 mainModules.modules)
- module.blocks
保存了当前 module 下异步类型的子 module(如资源文件、import("./pageB.js")), 对于这种 module 就会生成一个新的 chunk,
- module.variables
那么在这一步就是通过从入口 entry 的开始进行遍历生成入口的 chunks、chunkGroups、module,然后通过二次深度遍历入口 module.dependencies 、module.
其核心方法为:
初始化生成 Chunks
js
/*
			在我们处理入口文件(addEntry)和异步module(_addModuleChain)的时候都会讲一个slot保存到this._preparedEntrypoints中
			如我们的 main.js
		 */
for (const preparedEntrypoint of this._preparedEntrypoints) {
  // 获取准备作为一个入口module的module
  const module = preparedEntrypoint.module;
  // 名称
  const name = preparedEntrypoint.name;
  // 根据入口module的名称生成一个 chunk ,并且保存在 this.namedChunks()中去
  const chunk = this.addChunk(name);
  // 生成一个 enterpoint实例对象  enterpoint 继承与 ChunkGroup 所以其实际上也是根据name创建一个chunkGroup对象
  const entrypoint = new Entrypoint(name);
  entrypoint.setRuntimeChunk(chunk);
  entrypoint.addOrigin(null, name, preparedEntrypoint.request);
  this.namedChunkGroups.set(name, entrypoint);
  this.entrypoints.set(name, entrypoint);
  this.chunkGroups.push(entrypoint);

  // 建立 chunk 与 chunkGroup的关系
  GraphHelpers.connectChunkGroupAndChunk(entrypoint, chunk);
  // 建立 chunk 与 module 的关系
  GraphHelpers.connectChunkAndModule(chunk, module);

  // 保存当前chunk 的入口 module
  chunk.entryModule = module;
  chunk.name = name;

  this.assignDepth(module);
}
标记 module 的深度 depth 属性
创建 ChunkGraph
- visitModules
- 将 block 非异步模块通过深度遍历添加到当前模块的 blockInfoMap, 如果是异步模块 那么就创建一个新的 blockInfoMap 并添加到当前 blockInfoMap 中
主要的对象为
blockInfoMap 以 module 为 key 存放当前 module 下所有的同步 modules 和异步 blocks
chunkGroupCounters 以 chunkGroup 为 key,存放
{ index: number, index2: number }>}chunkGroupInfoMap :以 chunkGroup 为 key,存放
{ chunkGroup , minAvailableModules 。。。}
queue 这是一个处理队列 存放
- connectChunkGroups
建立异步 block 其 module 与其 chunkGroup chunkGroup 与父 chunkGroup 之间的关系 前面对于入口 module 其也通过 GraphHelpers.connectChunkGroupAndChunk(entrypoint, chunk); GraphHelpers.connectChunkAndModule(chunk, module); 建立的入口 module 与 chunk chunk 与 chunkGroup 之间的关系.
- cleanupUnconnectedGroups
移除没有连接的 chunks
优化 Chunks
对于优化 Chunks 的步骤 Webpack 主流程其实没有参与,主要是交给所有的 plugin 进行处理,这边只是回调对应的生命周期钩子函数
压缩 chunks
js
this.hooks.optimize.call();

while (
  this.hooks.optimizeModulesBasic.call(this.modules) ||
  this.hooks.optimizeModules.call(this.modules) ||
  this.hooks.optimizeModulesAdvanced.call(this.modules)
) {
  /* empty */
}
this.hooks.afterOptimizeModules.call(this.modules);

while (
  this.hooks.optimizeChunksBasic.call(this.chunks, this.chunkGroups) ||
  this.hooks.optimizeChunks.call(this.chunks, this.chunkGroups) ||
  this.hooks.optimizeChunksAdvanced.call(this.chunks, this.chunkGroups)
) {
  /* empty */
}
this.hooks.afterOptimizeChunks.call(this.chunks, this.chunkGroups);
module.id
对于这一步 主要是为 chunk 中的所有的 module 去生成一个唯一的 id, 其主要有两种类型
- name 类型 ,即为 module 文件的项目路径 ("./resolve/src/modules/module1.js")
- 数字类型
其核心代码如下
js
// ------------  module.id ----------------
// 触发了 NamedModulesPlugin 插件 为所有的module根据name(路径)生成module.id
this.hooks.beforeModuleIds.call(this.modules);
this.hooks.moduleIds.call(this.modules);
// 为不存在id的module生成id
this.applyModuleIds();
this.hooks.optimizeModuleIds.call(this.modules);
this.hooks.afterOptimizeModuleIds.call(this.modules);
this.sortItemsWithModuleIds();
// ------------ end: module.id ----------------
触发了 NamedModulesPlugin 的 beforeModuleIds 钩子函数,为文件类型的 module 根据其文件路径生成对应的 module.id。
通过两次遍历的方式为不存在路径 id 生成一个数字类型的 id
chunk.id
对于这一步 主要是为 chunks 中的 chunk 去生成一个唯一的 id, 其主要有两种类型
- name 类型 ,即为 chunk 的 name (这边不涉及到 WebapckChunkName 这个,对于非入口的异步 chunk 其 id 为数字类型)
- 数字类型
其核心代码如下
js
// ------------  chunk.id ----------------
// 触发 RecordIdsPlugin 记录chunk的id
this.hooks.reviveChunks.call(this.chunks, this.records);
this.hooks.optimizeChunkOrder.call(this.chunks);
// 触发 NamedChunksPlugin 插件
// 生成具有name的chunk的id为name,如 main
//  注意: 这边不涉及到 WebapckChunkName 这个,对于非入口的异步chunk其id为null
this.hooks.beforeChunkIds.call(this.chunks);
// 处理非入口的异步chunk,使用双循环的方式 生成唯一的自增 ID
this.applyChunkIds();
this.hooks.optimizeChunkIds.call(this.chunks);
this.hooks.afterOptimizeChunkIds.call(this.chunks);
// ------------ end: chunk.id ----------------
触发了 NamedChunksPlugin 的 beforeChunkIds 钩子函数,为文件类型的 chunk 根据其 name 生成对应的 chunk.id。
通过两次遍历的方式为不存在路径 id 生成一个数字类型的 id
生成 hash
这一步主要是为所有的 modules、chunks 去生成一个唯一的 hash, 注意: 这一步的 hash 不是我们 output 中的 contenthash hash 这个
其通过 cypto 包的 hash 算法根据 outputOptions.hashFunction hash的类型、outputOptions.hashDigest 偏移量、outputOptions.hashDigestLength hash偏移量长度、outputOptions.hashSalt hash的密盐 去创建相应的 hash。然后遍历入口 chunk 的 modules、chunks 为 module 和异步加载的 chunks 生成对应的 hash.
最后遍历所有的异步 chunks,根据其 template 生成对应 hash 的模板代码字符串内容
其具体流程如下
js
// chunk hash 处理
this.hooks.beforeHash.call()
this.createHash()
this.hooks.afterHash.call()

const compilation.createHash = () => {
  // 获取输出配置信息
  const outputOptions = this.outputOptions
  // 获取输出的 hash 生成方式 md4 ?
  const hashFunction = outputOptions.hashFunction
  const hashDigest = outputOptions.hashDigest
  const hashDigestLength = outputOptions.hashDigestLength
  // 生成 hash对象
  const hash = createHash(hashFunction)
  // 加入 密盐
  if (outputOptions.hashSalt) {
    hash.update(outputOptions.hashSalt)
  }
  // template 中修改为当前 hash 主要存在 mainTemplate chunkTemplate jstempalte webasstemplate ....
  this.mainTemplate.updateHash(hash)
  this.chunkTemplate.updateHash(hash)
  for (const key of Object.keys(this.moduleTemplates).sort()) {
    this.moduleTemplates[key].updateHash(hash)
  }
  // 加载子hash
  for (const child of this.children) {
    hash.update(child.hash)
  }
  for (const warning of this.warnings) {
    hash.update(`${warning.message}`)
  }
  for (const error of this.errors) {
    hash.update(`${error.message}`)
  }
  // 为当前chunks中所有的modules生成唯一的 hash
  const modules = this.modules
  for (let i = 0; i < modules.length; i++) {
    const module = modules[i]
    const moduleHash = createHash(hashFunction)
    module.updateHash(moduleHash)
    module.hash = /** @type {string} */ (moduleHash.digest(hashDigest))
    module.renderedHash = module.hash.substr(0, hashDigestLength)
  }
  // clone needed as sort below is inplace mutation
  const chunks = this.chunks.slice()
  /**
   * sort here will bring all "falsy" values to the beginning
   * this is needed as the "hasRuntime()" chunks are dependent on the
   * hashes of the non-runtime chunks.
   */
  chunks.sort((a, b) => {
    const aEntry = a.hasRuntime()
    const bEntry = b.hasRuntime()
    if (aEntry && !bEntry) return 1
    if (!aEntry && bEntry) return -1
    return byId(a, b)
  })
  // 1. 为当前chunks中所有的 异步加载 chunks 生成唯一的 hash
  // 2. 为当前 chunks下所有的chunk根据其template生成其存在 hash 的模板代码
  for (let i = 0; i < chunks.length; i++) {
    const chunk = chunks[i]
    const chunkHash = createHash(hashFunction)
    try {
      if (outputOptions.hashSalt) {
        chunkHash.update(outputOptions.hashSalt)
      }
      chunk.updateHash(chunkHash)
      const template = chunk.hasRuntime() ? this.mainTemplate : this.chunkTemplate
      template.updateHashForChunk(chunkHash, chunk, this.moduleTemplates.javascript, this.dependencyTemplates)
      this.hooks.chunkHash.call(chunk, chunkHash)
      chunk.hash = /** @type {string} */ (chunkHash.digest(hashDigest))
      hash.update(chunk.hash)
      chunk.renderedHash = chunk.hash.substr(0, hashDigestLength)
      this.hooks.contentHash.call(chunk)
    } catch (err) {
      this.errors.push(new ChunkRenderError(chunk, "", err))
    }
  }
  // 保存完整的 hash
  this.fullHash = /** @type {string} */ (hash.digest(hashDigest))
  // 保存截取hashDigestLength长度的 hash
  this.hash = this.fullHash.substr(0, hashDigestLength)
}
生成 module 资源
对于这一步的 module 资源的生成其主要应用于 file-loader 等这些不会处理资源的内容,只关注资源路径、名称等,那么对于这种静态资源会通过 createModuleAssets 进行处理。
作用: 主要就是根据 module.assets 的内容获取最终资源的路径和内容形成 { key,value}的格式并存放到 compilation.assets 中,提供给其他插件使用
js
	/**
	 * 创建 module 的静态资源
	 */
	createModuleAssets() {
		for (let i = 0; i < this.modules.length; i++) {
			const module = this.modules[i];
			// 判断是否存在静态资源
			if (module.buildInfo.assets) {
				// 获取静态资源的信息
				const assetsInfo = module.buildInfo.assetsInfo;

				for (const assetName of Object.keys(module.buildInfo.assets)) {
					// 获取资源的名称
					const fileName = this.getPath(assetName);
					this.emitAsset(
						fileName,   // 资源名称 xasdasdas.jpg
						module.buildInfo.assets[assetName],     // 资源的内容
						assetsInfo ? assetsInfo.get(assetName) : undefined
					);
					// 钩子函数
					this.hooks.moduleAsset.call(module, fileName);
				}
			}
		}
	}
生成 chunks 的资源
这才是静态资源生成的重点。其根据 chunk 的类型(入口 Chunk 、 异步加载 chunk)调用不同的 Template 进行处理,如入口Chunk => MainTemplate , 异步加载 chunk => ChunkTemplate,通过 template 返回的 render 方法生成对应 chunk 的 source、file。具体可以分为以下几个步骤
manifest
在 createChunkAssets 中会遍历所有的 chunk,然后根据其是否是 runtime 类型分别获取 MainTemplate 或者 ChunkTemplate 类型的 template,然后通过template.getRenderManifest({}) 从而得到生成 chunk 资源的所有信息 { render(), filenameTemplate, pathOptions, identifier, hash }。
其中有几个点:
- 如何判断是 runtime 类型
js
/**
 * 判断chunk是否是入口类型的
 * @returns {boolean} whether or not the Chunk will have a runtime
 */
const hasRuntime = () => {
  for (const chunkGroup of this._groups) {
    if (
      chunkGroup.isInitial() &&
      chunkGroup instanceof Entrypoint &&
      chunkGroup.getRuntimeChunk() === this
    ) {
      return true;
    }
  }
  return false;
};
从 chunkGroup instanceof Entrypoint 这个就可以判断 runtime 类型的主要是入口类型的 chunk,主要为 entry ,dll 等配置的工程入口
- manifest 是什么?
这是一个根据 chunk 的类型、outputOptions 等信息,然后经过 JavascriptModulesPlugin获取到生成 chunk 资源文件的详细信息的对象,其包含
- render() 执行函数,通过回调这个函数生成 chunk 的资源内容
- filenameTemplate :资源输出文件格式
[name].js - pathOptions 资源输出路径需要的信息 主要包含
- contentHashType : 资源的格式 "javascript"
- hash : 资源生成需要的 hash 信息 , 这是一个 20 位的长 hash
- chunk
- identifier : chunk 的标识符 如 chunk0
- hash : 长 hash 这是完整的根据默认 md4 生成的 hash
生成资源的最终文件路径信息
js
const pathAndInfo = this.getPathWithInfo(
  filenameTemplate,
  fileManifest.pathOptions
);
在上面获取到 manifest 的信息的时候,这时候就会根据 filenameTemplate 和 fileManifest.pathOptions 这两个信息生成最终的文件信息,其具体是交给 TemplatedPathPlugin 这个插件处理的, 大体如下
js
/**
 * 替换路径中的变量
 * @param  {[type]} path      [description]   输出的文件名称格式 [name].js 。。。
 * @param  {[type]} data      [description]   文件的信息
 * @param  {[type]} assetInfo [description]
 * @return {[type]}           [description]
 */
const replacePathVariables = (path, data, assetInfo) => {
  const chunk = data.chunk;
  // chunk 的id
  const chunkId = chunk && chunk.id;
  // chunk的名称用来替换 name
  const chunkName = chunk && (chunk.name || chunk.id);
  const chunkHash = chunk && (chunk.renderedHash || chunk.hash);
  const chunkHashWithLength = chunk && chunk.hashWithLength;
  const contentHashType = data.contentHashType;
  const contentHash =
    (chunk && chunk.contentHash && chunk.contentHash[contentHashType]) ||
    data.contentHash;
  const contentHashWithLength =
    (chunk &&
      chunk.contentHashWithLength &&
      chunk.contentHashWithLength[contentHashType]) ||
    data.contentHashWithLength;
  const module = data.module;
  const moduleId = module && module.id;
  const moduleHash = module && (module.renderedHash || module.hash);
  const moduleHashWithLength = module && module.hashWithLength;

  if (typeof path === "function") {
    path = path(data);
  }

  if (
    data.noChunkHash &&
    (REGEXP_CHUNKHASH_FOR_TEST.test(path) ||
      REGEXP_CONTENTHASH_FOR_TEST.test(path))
  ) {
    throw new Error(
      `Cannot use [chunkhash] or [contenthash] for chunk in '${path}' (use [hash] instead)`
    );
  }

  return (
    path
      // 替换路径中的 [hash] [hash:8]
      .replace(
        REGEXP_HASH,
        withHashLength(getReplacer(data.hash), data.hashWithLength, assetInfo)
      )
      // 替换路径中的 [chunkhash] [chunkhash:8]
      .replace(
        REGEXP_CHUNKHASH,
        withHashLength(getReplacer(chunkHash), chunkHashWithLength, assetInfo)
      )
      // 替换路径中的 [contenthash] [contenthash:8]
      .replace(
        REGEXP_CONTENTHASH,
        withHashLength(
          getReplacer(contentHash),
          contentHashWithLength,
          assetInfo
        )
      )
      // 替换路径中的 [modulehash] [modulehash:8]
      .replace(
        REGEXP_MODULEHASH,
        withHashLength(getReplacer(moduleHash), moduleHashWithLength, assetInfo)
      )
      // 替换路径中的 [id] 以chunkId作为值
      .replace(REGEXP_ID, getReplacer(chunkId))
      // 替换路径中的 [moduleid] 以moduleId作为值
      .replace(REGEXP_MODULEID, getReplacer(moduleId))
      // 替换路径中的 [name] 以chunkName作为值
      .replace(REGEXP_NAME, getReplacer(chunkName))
      // 替换路径中的 [file] 以filename作为值
      .replace(REGEXP_FILE, getReplacer(data.filename))
      // 替换路径中的 [filebase] 以basename作为值
      .replace(REGEXP_FILEBASE, getReplacer(data.basename))
      // query is optional, it's OK if it's in a path but there's nothing to replace it with
      // // 替换路径中的 [query] 以chunk的query值
      .replace(REGEXP_QUERY, getReplacer(data.query, true))
      // only available in sourceMappingURLComment
      // 替换路径中的 [url] 以url作为值
      .replace(REGEXP_URL, getReplacer(data.url))

      .replace(/\[\\(\\*[\w:]+\\*)\\\]/gi, "[$1]")
  );
};
构建资源
这一步会根据是否正在写入、是否有缓存内容等去进行各种情况的优化,在第一次的情况下,会调用上述 manifest.render()获取最终的 source 内容
js
source = fileManifest.render();对于这个 render 就需要分类型进行分析